Monday, January 21, 2013
Forgot your domain admin password? Whoops.
On a Win2k8r2 domain controller:
- Boot with the installation media (or any other WinPE kind of media)
- Go to the System32 directory
-
ren utilman.exe utilman.exe.bak
-
copy cmd.exe utilman.exe
- Reboot the system
- At the logon screen, press Windows Key + U. A command prompt will start.
-
net user Administrator "!mynewpass123"
- Log in, start a command prompt.
-
del utilman.exe
-
copy utilman.exe.bak utilman.exe
done :-)
Friday, November 30, 2012
Tuesday, November 6, 2012
Note the: /netonly
runas /netonly /user:domainusername “C:\Program Files (x86)\Microsoft\SQL Server\100\Tools\Binn\VSShell\Common7\IDES\sms.exe”
PS D:Usersxxx> (get-qaduser "myaccount").memberof.count
46

PS D:Usersxxx> (get-qaduser "myaccount").allmemberof.count
98

PS D:Usersxxx> (get-qaduser "myaccount").nestedmemberof.count
53
According to: http://msdn.microsof … ibrary/ms677943.aspx: “memberOf does not contain the user’s membership in domain local and global groups in other domains.”
Indeed, AllMemberOf shows these groups too (DomainLocal only in my example).
PS D:Usersxxx> $groups = (get-qaduser "myaccount").allmemberof

PS D:Usersxxx> foreach ($group in $groups)
{
  (get-qadgroup $group).GroupScope
}
Global
Global
Global
DomainLocal
Global
Wednesday, September 5, 2012
All those ways to get the size of directories with powershell are extremely slow. Especially on network shares.
e.g.
$colItems = (Get-ChildItem C:Scripts | Measure-Object -property length -sum)
"{0:N2}" -f ($colItems.sum / 1MB) + " MB"
Currently i’m harvesting through roughly 40TB of data and it’s taking me daaaaaaaaaays!
So i’m in desperate need of something faster.
Then i thought about robocopy. Robocopy gives great statistics. So if i do a “dry-run” (list-only, not really copy), i might get the information i need by parsing the output.
Choice of switches:
- /b = backup mode. Supposed to give me access to every file
- /l = list only/dry-run, not really doing the copy
- /mir = action what you would normally do when you would copy the data. This also dives into all subdirectories.
- /r:0 = no retries
- /w:0 = don’t wait on anything
- /ns /nc /nfl /ndl /njh = no logging of any kind. We only want the summary.
Then we get this piece of code (it could be a lot shorter, but i’m keeping it readable):
function get_size_of_dir_in_bytes_with_robocopy ($directory)
{
  write-host "- $directory" -foreground "GREEN"
  [string]$result = robocopy /b /l /mir "$directory" "c:\whatever" /r:0 /w:0 /ns /nc /nfl /ndl /njh /bytes
  if (!($lastexitcode -eq 16))
  {
    $pos = ($result).indexof("Bytes : ")
    $start = $pos + 8
    $length = $result.length
    $end = $length - $start
    $newstring = ($result).substring($start,$end)
    $newstring = $newstring.trim()
    echo $newstring.split()[0]
  }
  else
  {
    echo "CANNOT ACCESS"
  }
}
Monday, September 3, 2012
add the following lines to /etc/sysctl.conf
# IPv6
net.ipv6.conf.all.disable_ipv6 = 1
net.ipv6.conf.default.disable_ipv6 = 1
net.ipv6.conf.lo.disable_ipv6 = 1
… and reboot.
Or simply reload the settings:
sysctl -p
2019 update:
sysctl.conf still works, but it won’t be processed during boot.
Therefor recent Ubuntu’s need an extra grub parameter ipv6.disable=1. Like so:
GRUB_CMDLINE_LINUX_DEFAULT="splash quiet ipv6.disable=1"
GRUB_CMDLINE_LINUX="ipv6.disable=1"
Monday, August 13, 2012
Quick reference:
- wget http://downloads.linux.hp.com/SDR/downloads/bootstrap.sh
- chmod +x bootstrap.sh
- ./bootstrap.sh -v -r stable ProLiantSupportPack
- wget http://downloads.linux.hp.com/SDR/downloads/ProLiantSupportPack/GPG-KEY-ProLiantSupportPack
- apt-key add GPG-KEY-ProLiantSupportPack
- apt-get update
- apt-get install hpacucli
Too bad the hp software doesn’t support 3.x kernels, so you need to fool it a little.
setarch i686 --uname-2.6 hpacucli controller all show config
Tuesday, July 24, 2012
Because of my work, i come across a very common phenomen: the windows SMB protocol and how it relates to latency on your network. Office documents, even more than other types, seem to be affected.
I found a real nice whitepaper by Microsoft. It also contains a lot of (client side) fixes/suggestions.
Here’s a nice example and probably the main reason for the delay:

Monday, July 9, 2012
By default, your android calendar will synchronize:
- somewhere around 30-50 days in the past (i’m not exactly sure)
- all future items
- all recurring items
This means: when you start with a new phone or did a full wipe of your phone, you’ve lost all your history beyond 30-50 days. The only way to see these appointments is to log in to your web calendar.
To sync an old item, you could “refresh” the old items (say, edit some fields like location or time) but you don’t want to do that for thousands of items.
There is a way to “refresh” all your items at once:
- Log in to Google Calendar via the web
- Go to “Settings -> Calendar Settings” at the top
- Go to the “Calendars” tab
- at the bottom, next to “Create new calendar” you will find “Import Calendar” and “Export Calendars”
- Export your calendar and save the .zip to some place on your harddisk
- Unzip the .zip, you’ll get an .ics file
- Now choose Import Calendar and select the .ics file
- Your calendar will be overwritten with a backup of itself. No duplicates will be made (don’t worry)
- Your phone will notice all the “new” items and will download your entire calendar
Wednesday, June 20, 2012
Hmm seems like $lastexitcode is a builtin variable. Nice!
robocopy "\\serverA\shareA" "\\serverB\shareB" /MIR /R:0 /W:0 /MT:4 /NP /LOG:"d:\logs\shareA_to_shareB.log" | out-null
interpret_robocopy_error $lastexitcode
and the function interpret_robocopy_error could be something quick’n'dirty like this:
function interpret_robocopy_error ([int]$errorlevel)
{
  if ($errorlevel -eq 16) { echo "   - Robocopy - ***SERIOUS FATAL ERROR*** "}
  if ($errorlevel -eq 15) { echo "   - Robocopy - OKCOPY + FAIL + MISMATCHES + XTRA "}
  if ($errorlevel -eq 14) { echo "   - Robocopy - FAIL + MISMATCHES + XTRA "}
  if ($errorlevel -eq 13) { echo "   - Robocopy - OKCOPY + FAIL + MISMATCHES "}
  if ($errorlevel -eq 12) { echo "   - Robocopy - FAIL + MISMATCHES "}
  if ($errorlevel -eq 11) { echo "   - Robocopy - OKCOPY + FAIL + XTRA "}
  if ($errorlevel -eq 10) { echo "   - Robocopy - FAIL + XTRA "}
  if ($errorlevel -eq 9) { echo "   - Robocopy - OKCOPY + FAIL "}
  if ($errorlevel -eq 8) { echo "   - Robocopy - FAIL "}
  if ($errorlevel -eq 7) { echo "   - Robocopy - OKCOPY + MISMATCHES + XTRA "}
  if ($errorlevel -eq 6) { echo "   - Robocopy - MISMATCHES + XTRA "}
  if ($errorlevel -eq 5) { echo "   - Robocopy - OKCOPY + MISMATCHES "}
  if ($errorlevel -eq 4) { echo "   - Robocopy - MISMATCHES "}
  if ($errorlevel -eq 3) { echo "   - Robocopy - OKCOPY + XTRA "}
  if ($errorlevel -eq 2) { echo "   - Robocopy - XTRA "}
  if ($errorlevel -eq 1) { echo "   - Robocopy - OKCOPY "}
  if ($errorlevel -eq 0) { echo "   - Robocopy - No Change "}
}
Tuesday, June 19, 2012
Start your Network and Sharing center from the Control Panel
- Create a virtual wifi adapter. From an elevated dos prompt:
netsh wlan set hostednetwork mode=allow ssid=mobile_hotspot key=password keyUsage=persistent
In the Network and Sharing center, you’ll notice a new wireless connection, the default name will probably be “Wireless Network Connection 2”. Remember this, you’ll need it in step 2
- Choose a network connection you want to share, e.g. your Local Area Network Connection. Choose properties, the Sharing tab and enable the “Allow other network users …”.
Select the “Wireless Network Connection 2” (or something else from step 1) as Home networking connection.
- Start the wifi hotspot. From an elevated dos prompt:
netsh wlan start hostednetwork
Remember, the wifi hotspot will not start by default, so create a shortcut somewhere. Make sure you enable the “Run as administrator” in the shortcut property.
Monday, December 12, 2011
In my case i’m migrating from a Kerio Mailserver that is presenting all the folders as a subfolder of inbox, hence the
--sep1 . --prefix1 inbox
Always start the commands with the “–dry” option to do a dry-run (test-run) first!
To migrate the inbox and all subfolders:
imapsync --syncinternaldates --useheader 'Message-Id' --buffersize 8192000 --nosyncacls --host1 oldhost.domain.com --user1 [email protected] --passfile1 passfile1.txt --ssl1 --host2 imap.gmail.com --user2 [email protected] --passfile2 passfile2.txt --ssl2 --authmech2 LOGIN --sep1 . --sep2 . --prefix1 inbox --folderrec INBOX
Sent items need a little bit of translation. “Sent Items” will be translated to “[Gmail]\Verzonden berichten” (Dutch language).
imapsync --syncinternaldates --useheader 'Message-Id' --buffersize 8192000 --nosyncacls --host1 oldhost.domain.com --user1 [email protected] --passfile1 passfile1.txt --ssl1 --host2 imap.gmail.com --user2 [email protected] --passfile2 passfile2.txt --ssl2 --authmech2 LOGIN --sep1 . --prefix1 inbox --folder "Sent Items" --regextrans2 's/Sent Items/\[Gmail\]\/Verzonden berichten/'
Wednesday, August 17, 2011
Oops, tested the previous script on a samba server. For some reason, testing the script on a Windows 2008 R2 domain resulted in an exception. So here´s the new script.
Check will output warnings in red to your screen, all the rest of the data will go to the logfile.
For best results, export to a .csv and open in excel. Then sort the first column.
Calling the script:
path_depth_analysis "G:mydirectory" >c:output.csv
The script:
function path_depth_analysis( $path )
{
  $items = get-childitem $path
  if (!($items.count) -eq 0)
  {
    foreach ($item in $items)
    {
      [int]$length_path = $path.length
      [int]$length_item = $item.name.length
      [int]$total_length = $length_path + $length_item
      if ($total_length -gt 240)
      {
        $item_name = $item.name
        write-host "! - $total_length - $path -> $item_name" -foreground RED
      }
      [string]$fullname = $item.FullName
      [string]$type = $item.GetType().Name
      if ($type -eq "FileInfo")
      {
        echo "$total_length;file;$fullname"
      }
      else
      {
        echo "$total_length;dir;$fullname"
        path_depth_analysis "$fullname"
      }
    }
  }
}
Friday, August 12, 2011
this script doesn’t seem to work correctly in a Windows-Windows environment, please go to test for files or directories exceeding Windows MAX_PATH (v2)
This week i was reading about a customer that needed an analysis of files or directories that were “too long”. As you may or may not know: if the full path to a file exceeds 260 characters, you may be running into troubles, as Windows does not handle that particularly well.
Microsoft’s article on that: http://msdn.microsof … 365247(v=vs.85).aspx
So i was thinking, how hard can that be? Let’s start powershell and write down a couple of lines …..
$maxpath=260

function testmaxpath($source)
{
  $found_yet=0
  $items = get-childitem $source -recurse
  foreach ($item in $items)
  {
     $the_full_name = $item.fullname
     $the_length = [string]$item.fullname.length
     if ([int]$the_length -ge $maxpath)
     {
       write-host "$the_length $the_full_name" -foregroundcolor red
       $found_yet++
     }
  }
  echo "-----------------------------------"
  echo " found $found_yet files/directories"
  echo "-----------------------------------"
}
then just run it against a disk or share, e.g.
testmaxpath e:\data
or
testmaxpath \\192.168.1.5\share_x
That’ll give you a nice overview.
off topic:
if you really want to bug your system administrator, he’ll like this:
mkdir \\server\share\%username%\aaaaaaaaaaaaabbbbbbbbbbbbbbbbbbccccccccccccccccccddddddddddddddeeeeeeeeeeeeeffffffffffffffffgggggggggggggggghhhhhhhhhhhhhhhhhhiiiiiiiiiiiiiijjjjjjjjjjjjjjkkkkkkkkkkkkkkkklllllllllllllllllmmmmmmmmmmmmmnnnnnnnnnnnnnn
subst h: \\server\share\%username%\aaaaaaaaaaaaabbbbbbbbbbbbbbbbbbccccccccccccccccccddddddddddddddeeeeeeeeeeeeeffffffffffffffffgggggggggggggggghhhhhhhhhhhhhhhhhhiiiiiiiiiiiiiijjjjjjjjjjjjjjkkkkkkkkkkkkkkkklllllllllllllllllmmmmmmmmmmmmmnnnnnnnnnnnnnn
mkdir h:\aaaaaaaaaaaaabbbbbbbbbbbbbbbbbbccccccccccccccccccddddddddddddddeeeeeeeeeeeeeffffffffffffffffgggggggggggggggghhhhhhhhhhhhhhhhhhiiiiiiiiiiiiiijjjjjjjjjjjjjjkkkkkkkkkkkkkkkklllllllllllllllllmmmmmmmmmmmmmnnnnnnnnnnnnnn
subst i: h:\aaaaaaaaaaaaabbbbbbbbbbbbbbbbbbccccccccccccccccccddddddddddddddeeeeeeeeeeeeeffffffffffffffffgggggggggggggggghhhhhhhhhhhhhhhhhhiiiiiiiiiiiiiijjjjjjjjjjjjjjkkkkkkkkkkkkkkkklllllllllllllllllmmmmmmmmmmmmmnnnnnnnnnnnnnn
mkdir i:\aaaaaaaaaaaaabbbbbbbbbbbbbbbbbbccccccccccccccccccddddddddddddddeeeeeeeeeeeeeffffffffffffffffgggggggggggggggghhhhhhhhhhhhhhhhhhiiiiiiiiiiiiiijjjjjjjjjjjjjjkkkkkkkkkkkkkkkklllllllllllllllllmmmmmmmmmmmmmnnnnnnnnnnnnnn
subst j: i:\aaaaaaaaaaaaabbbbbbbbbbbbbbbbbbccccccccccccccccccddddddddddddddeeeeeeeeeeeeeffffffffffffffffgggggggggggggggghhhhhhhhhhhhhhhhhhiiiiiiiiiiiiiijjjjjjjjjjjjjjkkkkkkkkkkkkkkkklllllllllllllllllmmmmmmmmmmmmmnnnnnnnnnnnnnn
… and copy some files and set some weird acl’s on them.
Guess what will happen when he wants to delete those directories?
Oh boy, those were the days :)
Tuesday, August 9, 2011
Another great feature of SCCM is deploying operating systems.
Although you can deploy a whole range of Windows versions, i’m going to focus on deploying Windows 7 with SP1 included.
In order to support Windows 7 (with SP1), you’ll going to have to download and install an extra update from microsoft here kb2489044.
Also, there is an extra issue to deal with.
With the update above installed, it would be possible to support and deploy Windows 7 to known systems, meaning systems that are allready member of the domain and registered with sccm.
Since we’re talking about deploying Windows 7, it is very well possible that a brand new system has been unboxed and you want to deploy it right away. So we’re dealing with unkown systems here.
To support unkown systems, we need to have at least update R2 installed for SCCM 2007 SP2. But update R3 is out so we’re going to install R3.
Before installing R3, there’s a prerequisite here: kb977384.
Then download and install: Update R3 for SCCM 2007 SP2.
Build a reference system
The most easy way to deploy an image is to build a reference system first. This means a plain Windows 7 installation with only the essential software installed that you want to have on every pc. A virtual workstation, like one in VMWare, will do just fine.
Create capture media
Capturing the installation of the reference system is done through capture media.
This is basically a Windows PE cd/dvd or usb stick that copies the content of the harddisk to a .wim file on an external disk or network share.
When you think about that, it’s easy to understand that the PE environment needs to have access to the local harddisk and network interface.
And that’s why you have to make sure these drivers are available and that’s why we have copied al the drivers to “\\sccm01\clientdrivers\x86\vmware client\” in the last step above.
Now we have to update the capture media with those drivers.
- From the SCCM Console, expand site database, computer management, operating system deployment, drivers and rightclick drivers and click Import
- Choose “import all drivers in the following network path” and browse to “\\sccm01\clientdrivers\x86\vmware client\” and click Next
- In the overview you’ll see that all drivers for the audio, mouse, scsi controller and network controllers are found. Click Next
- Click “New Package”, Name = “VMWare Client” and Drive Package Source = “\\sccm01\clientdrivers\x86\vmware client\”, select “Update distribution points when ready” and click Next
- Do not update any boot images at this point and click Next, Next, Close
- From the SCCM Console, expand site database, computer management, operating system deployment, Boot Images and rightclick “Boot Image (x86)” and click Properties
- On the tab “Windows PE” select “enable command support (testing only)” and then click the yellow icon to import drivers
- Add all drivers, one by one (although only the scsi and network drivers are really relevant) . Eventually click OK and click YES to update the distribution point, Next, Next, Close.
- Repeat the steps for the x64 boot image
- From the SCCM Console, expand site database, computer management, operating system deployment, Task sequences, rightclick Task sequences and click Create Task Sequence Media
- Select “Capture media” and click Next, select “CD/DVD set” and click browse to select an output .iso file (e.g. sccm2007capture.iso) and click Save and click Next
- Click on Browse and select the boot image that matches your installation (x86 or x64) and click OK and Next, Next, Close
Capture the image
- Make sure you have a shared folder on your sccm server e.g. “\\sscm01\images” to store the image on.
- If you are working with a physical system, make sure you have burned the iso that has been created above. If you are working with vmware, put the iso on the datastore.
- Put the capture media in the dvd player. Autorun will start.
- “Welcome to the Image Capture Wizard” click Next
- Destination = “\\sccm01\images\win7sp1referencesystem.wim” and specify the correct network credentials so that after rebooting into PE mode, the capture media knows how to store the image on the SCCM server! Click Next
- Specify the information asked, click Next and Finish
- You may see some screens popping up, just wait and the client will reboot automatically and you´ll see the System Center background and the capture in action
- If all goes well, you’ll eventually get a message “Image successfully captured …”. press OK and the client will reboot. You can then power it off.
If you let it run, it’ll do some sort of “unattended” installation, but it’s pretty useless since the machine isn’t instructed properly what to do (e.g. like joining the domain, install extra components etc).
Import the image in SCCM
- Now that the image has been captured, we have to import it to SCCM
- From the SCCM Console, expand site database, computer management, operating system deployment, Operating System Images and rightclick “Operating System Images” and click “Add Operating System Image”.
- Point to the share where the images is located, e.g. “\\sccm01\images\win7sp1referencesystem.wim” and click Next, Next, Next, Close
- Rightclick the just created Operating System Image and click “Manage Distribution Points” and click Next, select “Copy the package to …” and click Next, select your SCCM server and click Next, Next, Close.
Prepare the PXE server
- Expand (in order) site database, site management, <your site>, site settings, site systems, <your server> and rightclick your server, select New Roles, Next, select “PXE service point” + Next
- Click yes at the warning.
- Select “Enable unkown computer support” and click OK at the warning dialog
- Deselect “require a password …” and click Next, Next, Next, Close
Create the Configmgr package
- Expand site database, computer management, software distribution and packages
- Rightclick Packages, select New, Package from Definition and click Next
- Select the “Configuration Manager Client Upgrade” and click Next
- Select “Always obtain files from a source directory” and click Next
- Select UNC path and your SCCM server should have a default share called \\<SERVERNAME>\sms_<SITECODE>\ with a client folder in it, so in my case “\\Sccm01\sms_vl3\Client”. Point to that directory and click Next and Finish
- Rightclick the just created “Microsoft Configuration Manager Client Upgrade 4.0 ALL” package and select “manage distribution points” and click Next
- Select “Copy the package …” and click Next
- Select only the primary distribution point and click Next, Next, Close
- Rightclick the just created “Microsoft Configuration Manager Client Upgrade 4.0 ALL” package and this time select “Update distribution points” and click Yes
Specify network access
If we’re going to boot from the network later on, and we need to access the distribution points, we need to authenticate.
- On the SCCM console expand site database, site management, <your site>, site settings, client agents and rightclick “Computer Client Agent” and select properties.
- Click on the “Set” button at Network Access Account.
- Specify the Administrator account for now and click OK and OK
- As of a security perspective this might not be best practice but for now it’s OK
Pretty much everything is covered now.
So if we would unbox a new computer, connect all the wires and execute a network boot, this is what we would see:
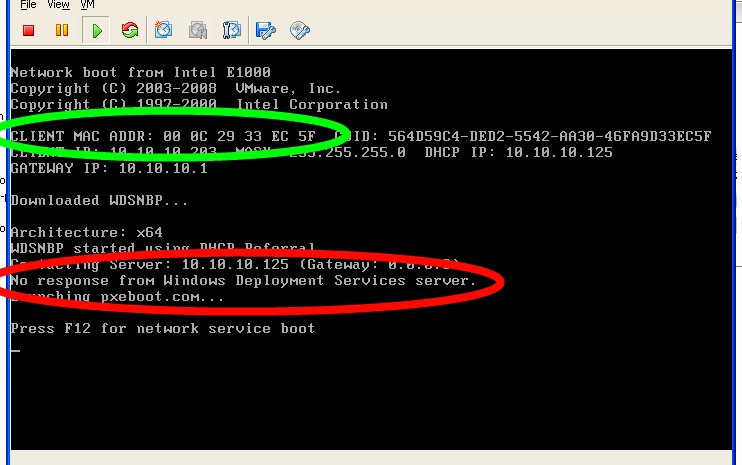
In red: The WDS (or SCCM) server is not responding.
In green: the mac address of this client.
What we need to do next is create a task somehow to deploy Windows 7 to this computer.
Create a collection
- On the SCCM console expand site database, computer management, collections, and richtclick collections en click on “New Collection”.
- Name = “Deploy Win7 with SP1” and click Next
- No membership rules are needed so just click Next and click OK on the warning.
- Click Next Next Close.
Add the computer (mac address) to the collection
- On the SCCM console expand site database, computer management, operating system deployment, computer association, and richtclick computer association and click on “Import Computer Information”.
- Select “Import Single Computer” and click Next.
- Provide the desired computername, e.g.”win7-001”, and provide the mac address of the client. Click Next, Next
- At “Choose Target Collection” select the collection that we’ve created above “Deploy Win7 with SP1”, Next, Next, Close
Create a Task Sequence
- On the SCCM console expand site database, computer management, operating system deployment, Task Sequences, and rightclick Task Sequences and click on “New, Task Sequence”.
- Select “Install an existing image package” and click Next.
- Give the sequence a name like “Install Windows 7 with SP1 on new systems” and select the boot image that corresponds with the architecture, e.g. x86, and click Next
- Select the Image Package (which is your previously captured image) and at Image select “All Images” (this is because a normal Windows 7 installation also contains a 100MB boot partition). Fill in the rest of the information, like the license code and type, and click Next.
- Specify the domain to join with the right credentials and the OU you want to place the computeraccount in and click Next
- Click Browse to select the Configuration Manager package. Click Next.
- Deselect all Stage Migration settings, we’re not going to do that on new systems. Click Next
- “Don’t install any software updates” and click Next, Next, Next, Close.
Modify the task sequence
There is a small “bug” in the default task sequence if you ask me.
If you edit the task sequence, you’ll see that the network configuration is taking place before the device drivers are installed. This should be in reversed order.
- On the SCCM console expand site database, computer management, operating system deployment, Task Sequences, and rightclick the sequence created above and click on Edit.
- Select the green item called “Apply network settings” and drag it just below “Setup Operating System”
With that out of the way there is something with the partitioning to worry about:
- Select the green item called “Partition Disk” and in the “Volume” overview, you’ll see two volumes. One Primary volume with a fixed size of 100MB and one Priamary volume with a fixed size of the original disk of the reference system. Select that volume and click edit. Select “Use a percentage…” and set it to 100%. Click OK and OK.
- Select “Apply Operating System” and make sure that at “Apply operating system from a captured image” image 2-2 is selected
- Select “Apply data image 1” and make sure that at “image” image 1-1 is selected
- Drag task “Apply data image 1” above “Apply Operating System” and beyond “Partition disk”
If you want you can add custom taks or edit. Just look around, very cool! :-)
Hint: look at the partitioning settings and when formatting the disks, make sure you select quick format. Saves a lot of time!
Assign (advertise) the task sequence to new computers
- On the SCCM console expand site database, computer management, operating system deployment, Task Sequences, and rightclick the sequence created above and click on Advertise.
- Click on the browse button to select a collection and select the “Deploy Win7 with SP1” collection that we have created before. Also select “Make this task sequence available to boot media and PXE”. Click Next, Next.
- At the Distribution Point screen, make sure you also select “When no local distribution point is available, use remote distribution point” and click Next, Next, Next, Next, Close.
If you go to the “Deploy Win7 with SP1” collection, doubleclick on the “Win7-001” and go to the advertisements tab, you’ll see that the “Install Windows 7 with SP1 on new systems” is assigned to this computer.
That’s it. Perform a network boot and sit back!
Friday, August 5, 2011
SCCM is capable of managing Software Updates, but it relies on WSUS for that. So you need to have that installed. If you’ve followed this guide, you have.
Whereas for WSUS you need to configure group policies, for SCCM everything runs through the SCCM client so you don’t need to worry about that.
Enable the Software Updates part in SCCM
- Expand (in order) site database, site management, <your site>, site settings, site systems, <your server> and rightclick your server, select New Roles, Next, select “software update point” + Next
- At the Active Settings window, check the “Use this server as the active software update point” + click next
- Enable a schedule (1 day for now) and click next
- Select classifications and click next
- Select the products and click next
- Select and deselect the appropriate languages and click next
- Next, Next, Close
If you want to change any settings later, expand site database, site management, <your site>, site settings, component configuration and rightclick “Software Update Point Component” and click properties.
Start initial synchronization
- Expand site database, computer management, software updates, Update Repository
- Rightclick Update Repository and click Run Synchronization
Download the System Center Configuration Manager 2007 Toolkit V2 and use Trace32 to tail the logfile “c:\program files (x86)\Microsoft Configuration Manager\Logs\wsyncmgr.log” to watch the progress of the synchronization.
Configure the Software Updates Client
- Expand (in order) site database, site management, <your site>, site settings, client agents
- Rightclick Software Updates Client Agent and click properties
- Adjust the schedule to 1 day
- On the tab Update Installation select “Enforce all mandatory deployments” and set it to 1 hour. Also enable the “Hide all deployments from end users”. Click on OK
Create templates
- Expand site database, computer management, software updates, deployment templates
- Rightclick deployment templates and select new deployment template.
- Name it “Windows 7 updates”, since we’ve created a collection of Windows 7 stations previously, and click next
- Browse for the “All Windows 7 Systems” that we’ve created in Part 4 of this SCCM series, click OK and next
- Select Suppress notification, since the end user doesn’t have to be bothered with this, and set the Duration to 1 hours, which means that updates will be deployed fast. Click next
- Select Workstations to suppress the reboot notifications for the end user and click next
- Select the “Generate Operation Manager alert when a software update installation fails” and click next
- Select “Download software updates from distribution point and install” on both scenarios and click next
- Click next on the “SMS 2003” window
- Next, Close
Now before you can continue, you have to make sure that the software updates are synchronized with Microsoft. Use the Trace32 mentioned above.
Create a search folder and an update list
Deploy the Update list to the template
- First, we need to create a share on the SCCM computer to where the updates can be temporary downloaded to.
- Create something like “E:\tmp_downloads”
- Share this folder and add “domain admins” and the sccm computeraccount to the sharing and ntfs permissions with full control
- In the SCCM console, expand site database, computer management, software updates, update lists AND deployment templates so you see them both.
- Drag the “Windows 7 update list” on to the “Windows 7 workstations” deployment template
- If there are any license terms you need to accept, you’ll have an extra window in where you need to accept the license terms
- Next, at “create a new deployment package”, specify a name like “Windows 7 update package” and point the package source to the share you’ve created (”\\SCCM01\tmp_downloads”). Enable “Enable binary differential replication” and click Next
- Browse to select your distribution point, which is your sccm server, and click Next
- “Download the updates from the internet” and click Next
- Choose your languages but they should already match your template and click Next
- Choose a schedule or leave it to the defaults and click Next
- Next, Next (updates will be provisioned)
- Close
Now from time to time keep updating your list and drag it to the deployment template. Since you’ve enabled binary differential replication, clients that already have received most of the list, will only transfer the differential.
Best practice is to create a couple of deployment templates, based on the priorities, so for example you can deploy critical updates faster than other updates.
Thursday, August 4, 2011
One of the main reasons (amongst others) that you are going to use SCCM is probably to distribute software to clients and servers on your network.
To enable this functionality
- Expand (in order) site database, site management, <your site>, site settings, site systems, <your server> and on the right pane, rightclick “ConfigMgr distribution point” and properties.
- Select “Allow clients to transfer content from this distribution point using bits, http, and https ….)” and click OK
Add a package to the inventory
- First, let’s download a nice utility called DoPDF. On that url, you’ll find a setup file. I’m saving it in the Downloads folder but in a subfolder called “DoPDF 7”.
- On the SCCM console, expand (in order) site database, computer management, software distribution, packages
- Rightclick packages and click “new -> package” and fill in the details (DoPDF, 7.x, DoPDF, English) and click Next.
- Select “This package contains source files” and click on Set, “Local Drive …” and point to the folder where you’ve downloaded the msi file to. Click OK, Next, next, next, next, finish, close.
Add a program to the package
After creating the package, you can add one or more programs to the package.
- Expand “DoPDF DoPDF 7.x English” and beneath that rightclick Program. Select New Program.
- Name will be (again??) “DoPDF 7”, for commandline, browse to the directory and select the “dopdf-7.exe” but append the commandline with “/VERYSILENT /NORESTART”. These are however specific commands for this utility, so you’ll have to adapt for other installations. Click Next
- Enter an estimation of the disk usage (so that the sccm client can abort the installation if a computer runs out of space) and the time the installation will approximately take. Optionally select specific platforms. Click Next.
- At the environment level, you can specify whether the setup will run as the user currently logged on or with administrative rights. I suggest you set it to administrative rights and do not select “Allow user to interact with this program”. Click Next, Next, Next, Finish, Next, Close.
Distribute the package to a distribution point
There can be more than one distribution point in a bigger organization but in this case we only have to distribute it to one point.
- Rightclick Distribution point and click “manage distribution points”. Click next, “copy the package to the new distribution points” + Next, select your SCCM server + Next, Next, Next, Close.
- Expand “package status” untill you see your SCCM site, refresh, and in the right pane you’ll see the status of your package being copyed to your distribution point. “Installed” means it is transfered to the distribution point.
Assign the package to clients
- Expand (in order) site database, computer management, software distribution, advertisement
- Rightclick advertisement, New, Advertisement. I’m naming this taks “DoPDF 7.x for Windows 7 Clients”. Click on browse to select the DoPDF 7.x package. And click on browse to select a collection, in my case “All Windows 7 Systems” and click Next.
- On schedule you can schedule this deployment to a specific date or time, you can even enable Wake-on-LAN if you want (but you’ll have to enable wake on lan on the site properties first!), but for now click on the yellow icon that looks like a sun and select “as soon as possible” and press OK. Click next.
- On Distribution Point select “download from distribution point and run locally” on both occasions and click next, next, next, Finish, next, close.
The default polling interval of your clients is 60 minutes, so with a maximum of 60 minutes the installation will start.
You can set the interval higher at site settings -> client agents -> computer client agent properties. For this test environment it’s safe to set it to a really low value like 1-5 minutes, but in a bigger environment you don’t want to stress the SCCM server and your network.
If, after installing SCCM 2007 SP2, you take a look at the collections (under Computer Management), you’ll see that it’s not really up to date. Servers up to Windows 2003 and workstations up to Windows XP are available, but no Windows 2008 (r2?) or Windows 7 is present.
If you are going to delegate tasks to systems, you might want or need some more finegrained collections.
Collections are based on query’s, so in order to create a new collection for Windows 7, we’re going to do the following:
- Rightclick Collections, New Collection
- Name and Comment: “All Windows 7 Systems”, click next
- Click on the yellow database icon, set name to “All Windows 7 Systems”, resource class is “System Resource” and click on Edit Query Statement.
- Go to the tab Criteria
- Click on the yellow icon, click on the Select button
- Attribute Class = “System Resource”, Attribute is “Operating system name and version”, click OK
- Operator = “is like”
- Value = “%Workstation 6.1%” (which basically means, if you combine it with the operator “is like”, that it must contain “Workstation 6.1”)
- Click OK, OK, Next, Finish
- Rightclick the new “All Windows 7 Systems”, click “Update Collection Membership”, rightclick again and click refresh. The Windows 7 systems should appear.
Use your imagination to create all sort of collections you might need. Like systems with 512MB ram or less, systems with de specific type of cdromdrive, anything you can imagine.
By the way: Windows 2008 R2 would be “%Server 6.1%” as value
After the previous article, the installation of SCCM 2007 SP2, it’s time to do the basic configuration.
Basic configuration, find clients on the network
Log on to the Configuration Manager Console
Push the sccm client to clients and servers
- Expand (in order) site database, site management, <your site>, site settings, client installation methods.
- Rightclick “Client Push Installation”, properties.
- Click “enable client push installation…” and click on OK at the popup window.
- Select servers, workstations and domain controllers and also “Enable client push installation to site systems”
- On the tab accounts, click on the button that looks like a sun and specify the administrator account (best practice is that you will not use that in a production environment!!), OK, Apply, OK
Go back to your collection of computers, “update collection membership” and then “refresh” and after a while the table “Client” will say YES to indicate the SCCM client has been installed.
Create some reports
After the client has been pushed to all desired systems, you want to do something with the collected information.
- Expand (in order) site database, site management, <your site>, site settings, site systems, <your server> and rightclick your server, select New Roles, Next, select “reporting point” + Next, Finish, Next, Close.
- Expand (in order) site database, computer management, reporting, Reports and rightclick a desired report, e.g. “Computers in a specific workgroup or domain” and select Run.
- Or rightclick Reports and select Run. A browser will open and you can click through all the reports. Cool uh?
Wednesday, August 3, 2011
Continuing the previous article, once you have all the prerequisites in place, you are ready for the installation of SCCM 2007 SP2.
Extend the active directory schema
First, you have to extend the Active Directory Schema. The best way to do this is to log on to on the domain controller that holds the schema master role and start an elevated dos prompt. Then run the following program from the SCCM 2007 SP2 cd (or files on a share):
"\smssetup\bin\i386\extadsch.exe"
If you encounter errors like these:
<09-11-2010 17:53:11> Modifying Active Directory Schema - with SMS extensions.
<09-11-2010 17:53:11> DS Root:CN=Schema,CN=Configuration,DC=stpauls,DC=qld,DC=edu,DC=au
<09-11-2010 17:53:11> Failed to create attribute cn=MS-SMS-Site-Code.  Error code = 8224.
<09-11-2010 17:53:11> Failed to create attribute cn=mS-SMS-Assignment-Site-Code.  Error code = 8224.
...
<09-11-2010 17:53:12> Failed to extend the Active Directory schema.
.. you probably have some replication issues to deal with first. Or, in my case, the domain had one or more child domains and those domain controllers were offline. Make sure they are online and reachable.
Add the computer account to the System container
- On the domaincontroller, start Active Directory Users and Computers.
- Make sure you have advanced features enabled (View, Advanced Features)
- Rightclick the “System” container, properties
- Security, Add, Object Types, enable Computers + OK, type in your SCCM computername and click OK
- Make sure your SCCM computername is selected, then click full control, followed by advanced
- Locate your SCCM computeraccount, select it and click on Edit, set Apply to to “This Object and all descendant objects”, OK, OK
Install SCCM
- From te splash screen run the “Run the prerequisite check”
- If you’ve followed my previous article and you’ve installed SQL, enter your servername (my case: SCCM01) in the first two fields and press OK
- Checks will run and if all goes well you’ll see “All required prerequisite tests have completed successfully”
- On the splash screen click on “Install - Configuration Manager 2007 SP2”
- Next, Next, I accept + Next, Custom Settings + Next, Primary Site + Next, Next, …. Next, Enter a (3 cypher/letter) site code and a description (”VL3” and “Test VLAN 3” in my case) for the site and on the next screen select Mixed Mode, unless you have a Public Key Infrastructure in place and configured for SCCM.
- Keep all the rest of de settings default until you reach the “Updated Prerequisite Components” screen. Select the “Check for updates …” and click Next. Select a folder to download the updates (e.g. e:\downloads\) and hit Next. Some updates will be downloaded.
- Once downloaded, you come to the Settings Summary. Press Next and another prerequisite check will run. If all goes well, press “Begin Install”.
- Press Finish.
- Reboot the computer and SCCM 2007 SP2 is ready for configuration
I’ve been talking to some people about SCCM recently and it seems to be difficult to understand the whole process to set it up right. Therefore i’m going to share my experiences.
This first part covers all the prerequisites and setting them up.
1 - The (simple) setup
I’m going to presume an active directory is already present.
My (vmware) setup:
- DC1
- Windows 2008 R2 with SP1
- 1vCPU, 512MB ram, 1×32GB harddisk (C:)
- 10.10.10.100
- role: the one and only domain controller responsible for the domain “tailspintoys.com”.
- SCCM01
- Clean installation with Windows 2008 R2 with SP1 added to the “tailspintoys.com” domain
- 2vCPU, 2GB ram, 2×32GB harddisk (C: and E:, D: is the dvd player)
- 10.10.10.125
- role: going to be the SCCM 2007 SP2 server, also acting as SQL, WDS and IIS server. More on that later.
2 - Windows 2008R2 Roles, Features and configuration for SCCM
Features
On SCCM01, let’s add some features first. Start the server manager, go to features, add features:
- select feature “background intellingend transfer service (BITS)”
- yes, “Add Required Role Services”
- select feature “remote differential compression”
- next, next
- since we’ve added the webserver role (that came with BITS) we now have the chance to add extra role services for this role. Add the following:
- “Webdav Publishing”
- “ASP .NET” (yes, add the dependencies)
- ASP (you’ll need that for the reporting of SCCM, at first i forgot which led to “HTTP error 404.3 - Not Found” errors)
- “Windows Authentication”
- “IIS6 WMI Compatibility”
- next, install, close
Configure webdav
Now we have to configure the webdav properties for the default website in IIS. You can do it later after SCCM is fully installed but you have to do it at some point so why not do it now.
Microsoft has a document on this but here it is in short:
- Start the IIS manager
- Expand till you see the default website. Click on it.
- In the middle pane, doubleclick “Webdav Authoring Rules”
- In the right pane, select “enable webdav”, followed by “Webdav Authoring Rules”, followed by “Add Authoring Rule”
- “All Content”, “All Users”, “Read” + OK
- In the right pane, select “Webdav Settings”
- Allow anonymous property queries = True
- Allow Custom Properties = False
- Allow property queries with infinite depth = True
- Allow hidden files to be listed = True
- In the right pane, click Apply
- Close the IIS manager
Roles
As SCCM needs WSUS and relies on the PXE server from WDS, we have to install some additional roles. Go to the server manager, roles and add the following role first. You have to install the WSUS role later, you can’t select it with other roles at the same time. So first:
- Windows Deployment Services. Just next, next next, ….
Now add the following role:
- Windows Server Update Services (yes, add the dependencies). Next, next, next, ….
- If you are wondering why installation takes such a long time, notice the window on your taskbar. An additional screen with “Welcome to Windows Server Update Services 3.0 SP2 Setup Wizard” has opened.
- I’ve placed the wsus data on E:\WSUS and i’m using the Windows internal database, but other circumstances may apply.
- Click through the setup till the end and click Finish
- When the roles are installed, click Close. A new window to configure WSUS will open.
- Cancel these configuration steps.
Configure WDS
- From the Administrative Tools, start Windows Deployment Services.
- Expand servers, Rightclick SCCM01 and select Configure Server
- I’m storing the data on E:\RemoteInstall but change to match your environment
- I’m selecting “Respond to all client computers (Known and Unknown)” but that’s also a choice
- Don’t select “Add images to the server now” and Finish
If you are not going to run DHCP on this server, skip this next 3 steps. But if you are going to install the DHCP role on this server then do the following prior to installing the DHCP role:
- Rightclick the SCCM01 server and select Properties
- Go to the tab DHCP
- Select the first option “Do not listen on port 67”.
Optionally: Install and configure the DHCP role on this server
This is optional. You can run DHCP on any other server too.
But if you are installing DHCP on this server (i’m sure the basic configuration doesn’t need additional explaining here), all you have to do is go to the WDS settings (above) and on the DHCP tab select the “Configure DHCP option 60 …”. Then restart the DHCP service.
Configure DHCP that runs on a different server
If you are running DHCP on a different server in your network, configure options 66 with the ip-address of the WDS server and option 67 with “boot\x86\wdsnbp.com”. “wdsnbp.com” is a little utility that automatically determines the platform so it will automatically switch to x86 or x64 if neccessary.
At this point, all the Windows “internal” software related prerequisites on the SCCM01 server are in place.
3 - Other prerequisites
Associate a subnet with a site
To define a boundary for SCCM later, it is important to have a subnet defined and match it with a site in active directory.
So if you have not defined a subnet yet (if you have done a plain active directory installation, you won’t), then log on to the domain controller and do the following:
- Open Active Directory Sites and Services
- Expand till you see Subnets
- On Subnets, rightclick and select “New Subnet”
- Prefix: in my case: 10.10.10.0/24 and select a site object from the box below (on a plain installation it’s just Default-First-Site-Name)
Install SQL server for SCCM
To start with: i’m far from an expert on SQL. Beste practices may be different. But to get things up and running, the following will work.
SCCM won’t work on Express editions of SQL, so make sure you have a full version (get trial version here). I’ve read rumours that SCCM 2007 SP2 doesn’t work on SQL 2008 R2 but it does!
- On the domain controller, start “Active Directory Users and Computers” and create a group called “SQL Admins” and make this group member of the group “Domain Admins”
- Also create a new account called “sql2008r2”. Make this user member of the group “SQL Admins”
- On the SCCM server, go to the server manager, add the feature “.NET Framework 3.5.1 Features” and add the required dependencies. Next, Install, Close
- Reboot the server prior to installing SQL to be sure you don’t have pending installation tasks
- Run setup.exe. On the first page, there’s a System Configuration Checker. Run it, all checks should be OK. If not, correct them
- Click on Installation on the left side of the screen, then select “New installation …”
- Keep everything default unless stated otherwise.
- At “Setup Role”, choose “SQL Feature Installation”
- Only the “Database Engine Service” is really required, but you also want to select “Reporting services” to create all kinds of cool reports from SCCM later. Also select “Management Tools - Complete”.
- At “Server Configuration”, click on “use the same account for all services” and supply the “sql2008r2” account created in the second step.
- At “Database Engine Configuration”, click “Add the current user” followed by “Add” and also add the “SQL Admins” group.
- Complete the rest of the installation of SQL
Your system is now ready for the installation of SCCM 2007 SP2
Tuesday, July 19, 2011
Maybe a bit late ….
Windows 7 offers a very handy feature called the Audit Mode. I’ve blogged about that before. This enables you to prepare the computer for the end-user, therefore it skips the whole OOBE (Out Of Box Experience) and the creation of local user accounts.
Windows XP does not have that feature so on the end of a fresh installation of Windows XP you’ll be prompted to create a user account and Windows will then automatically log in with that account. Microsoft doesn’t allow you to skip this, so you will always have to create a second local account (besides the Administrator account).
I recently found out a way to bypass this. Ok, resetting the machine does the trick also. But a more friendly way is to type SYSTEM in the first field.
Thursday, July 14, 2011
If you want to rsync data from/to a remote server with ssh, you could do something like this:
rsync -av [email protected]:/backup/* /storage/monday/
But what if ssh listens on port 2222?
rsync -av --rsh='ssh -p2222' [email protected]:/backup/* /storage/monday/
But what if you need sudo permissions?
Server-side configuration (/etc/sudoers)
#sudo access for myusername running rsync backup
myusername ALL=NOPASSWD:/usr/bin/rsync
Client-side:
rsync -av --rsh='ssh -p2222' --rsync-path="sudo rsync" [email protected]:/backup/* /storage/monday/ .
And in case you want to include multiple directories:
rsync -av --rsh='ssh -p2222' --rsync-path="sudo rsync" [email protected]:{/backup,/root,/etc} /storage/monday/
Thursday, June 23, 2011
(for mr Face ;-) )
Whereas point and print restrictions was a user policy for clients < Win7, as of Win7 it is a computer policy.
So to prevent installations prompts for printers:
- Computer Configuration
- Policies
- Administrative Templates
- Point and Print restrictions = Disabled