curl -v --proxy-negotiate -u : https://blog.mydomain.com --proxy http://proxy.lan.local:3128
Wednesday, February 19, 2025
curl with auto negotiated proxy authentication
Wednesday, January 22, 2025
Change password in RDP
There are some key combo’s like ctr-alt-end that might work in an RDP session. However, there are some scenario’s (e.g. with a Mac) that make it complicated.
Workaround:
C:\Windows\explorer.exe shell:::{2559a1f2-21d7-11d4-bdaf-00c04f60b9f0}
Thursday, August 22, 2024
Dump ssl keys with chrome for usage with Wireshark
"C:\Program Files\Google\Chrome\Application\chrome.exe" --ssl-key-log-file=%USERPROFILE%\Desktop\keylog.txt
Wednesday, December 13, 2023
PL2303 usb-to-serial
For some reason this pl2303 won’t even work on linux and thus requires Windows.
Even then, you need this fix anno 2023.
Friday, March 18, 2022
Run powershell specific function from task scheduler
Executable is powershell.exe. Arguments:
-command "& { . "c:\location\to\script.ps1"; my_function_name }"
Powershell speed hacks
Powershell can be painfully slow when dealing with larger arrays, reading files and listing large directories. Here are some workarounds.
Arrays
Slow:
$myarray = @()
foreach ($x in $y) {
  $myarray += $x
}
Much faster is working with an arraylist:
$myarray = [System.Collections.ArrayList]@()
foreach ($x in $y) {
  $null = $procarray.Add($x)
}
Reading files
Slow:
get-content $filename
Fast:
([System.IO.File]::ReadAllLines($filename))
Listing large directories
Slow:
$items = get-item "\\server\share\*.csv" | sort LastWriteTime
The fastest workaround i’ve been able to find is actually using a dos prompt. Use dir switches for sorting purposes.
Note: dir returns just text, while get-items returns objects with all sorts of properties. It depends on your use case whether this hack is actually usable or not.
$items = cmd /r dir "\\server\share\*.csv" /OD /B
Tuesday, October 5, 2021
Install Windows 11 without TMP 2.0
When Windows 11 complains about your system not being compliant:
- press shift+F10
- regedit
- Navigate to HKEY_LOCAL_MACHINE\SYSTEM\Setup
- new key: LabConfig
- new dword value: BypassTPMCheck = 1
- new dword vlaue: BypassSecureBootCheck = 1
Go back and resume the installation again.
Thursday, October 10, 2019
Win 10 slow startup caused by AMD Radeon graphics card
Reminder: Look in registry for EnableUPLS and set 1 to 0.
Friday, July 18, 2014
ParentContainer
Quest active directory powershell module has this nice property for user and computer objects: ParentContainer
Microsoft’s native ActiveDirectory module doesn’t.
I’m using this property a lot because it looks much more friendly than the CanonicalName.
Here’s a simple function to achieve the same.
function CanonicalName_to_ParentContainer ($cname)
{
  try
  {
    $lastslash = $cname.lastindexof("/")
    $cname.substring(0,$lastslash)
  }
  catch
  {
    $cname
  }
}
Friday, May 9, 2014
Add Windows back to Grub2
My lifesaver:
create and chmod +x the file:
/etc/grub.d/15_Windows
Add this code:
#! /bin/sh -e
echo "Adding Windows" >&2
cat << EOF
menuentry "Windows" {
set root=(hd0,1)
chainloader +1
}
EOF
for grub2:
grub2-mkconfig -o /boot/grub2/grub2.cfg
or:
grub-mkconfig -o /boot/grub/grub.cfg
Friday, December 20, 2013
Batchfile loginscript domain check
ping servername.domain.local -n 1 >NUL
if NOT %ERRORLEVEL%==0 GOTO OFFLINE
  call \\servername.domain.local\share\Extra_Login_Stuff.bat
:OFFLINE
Tuesday, December 10, 2013
Powershell IP address computations
Very neat function for powershell ip computations:
source: technet
function Get-IPrange
{
<#
  .SYNOPSIS
    Get the IP addresses in a range
  .EXAMPLE
   Get-IPrange -start 192.168.8.2 -end 192.168.8.20
  .EXAMPLE
   Get-IPrange -ip 192.168.8.2 -mask 255.255.255.0
  .EXAMPLE
   Get-IPrange -ip 192.168.8.3 -cidr 24
#>

  param
  (
    [string]$start,
    [string]$end,
    [string]$ip,
    [string]$mask,
    [int]$cidr
  )

  function IP-toINT64 () {
    param ($ip)

    $octets = $ip.split(".")
    return [int64]([int64]$octets[0]*16777216 +[int64]$octets[1]*65536 +[int64]$octets[2]*256 +[int64]$octets[3])
  }

  function INT64-toIP() {
    param ([int64]$int)

    return (([math]::truncate($int/16777216)).tostring()+"."+([math]::truncate(($int%16777216)/65536)).tostring()+"."+([math]::truncate(($int%65536)/256)).tostring()+"."+([math]::truncate($int%256)).tostring() )
  }

  if ($ip) {$ipaddr = [Net.IPAddress]::Parse($ip)}
  if ($cidr) {$maskaddr = [Net.IPAddress]::Parse((INT64-toIP -int ([convert]::ToInt64(("1"*$cidr+"0"*(32-$cidr)),2)))) }
  if ($mask) {$maskaddr = [Net.IPAddress]::Parse($mask)}
  if ($ip) {$networkaddr = new-object net.ipaddress ($maskaddr.address -band $ipaddr.address)}
  if ($ip) {$broadcastaddr = new-object net.ipaddress (([system.net.ipaddress]::parse("255.255.255.255").address -bxor $maskaddr.address -bor $networkaddr.address))}

  if ($ip) {
    $startaddr = IP-toINT64 -ip $networkaddr.ipaddresstostring
    $endaddr = IP-toINT64 -ip $broadcastaddr.ipaddresstostring
  } else {
    $startaddr = IP-toINT64 -ip $start
    $endaddr = IP-toINT64 -ip $end
  }

  for ($i = $startaddr; $i -le $endaddr; $i++)
  {
    INT64-toIP -int $i
  }

}
Monday, May 13, 2013
Dump Exchange mailbox permissions
A complete script to first dump all exchange mailboxes to .csv and then enumerate all mailbox permissions.
It uses the Exchange 2010 management shell and Quest’s Active Directory Powershell modules.
Usage:
- Load the script in the ISE editor.
- Set the two global parameters
- Run the script
- first execute: dump_mailboxes (this wil generate a .csv with all mailboxes)
- then execuite: dump_all_mailbox_permission (this will generate a second .csv with all permissions. Open in Excel to filter)
echo "-"

$global_ad_domain = "AD.CUSTOMER.LOCAL"
$global_ad_short = "AD"

### Load Modules for Active Directory and Exchange 2010
if (!($QUEST_LOADED))
{
  Add-PSSnapin Quest.ActiveRoles.ADManagement
  Set-QADPSSnapinSettings -DefaultSizeLimit 0

  $logged_on_to = $env:USERDNSDOMAIN
  if (!($logged_on_to -eq "$global_ad_domain"))
  {
    $user = read-host "Enter username in adusername format"
    $pw = read-host "Enter password" -AsSecureString
    connect-QADService -service '$global_ad_domain' -ConnectionAccount $user -ConnectionPassword $pw
  }
  else
  {
    connect-QADService
  }

  Set-QADProgressPolicy -ShowProgress $false
  $QUEST_LOADED=$TRUE
  echo "quest loaded"
}

if ($EMS_loaded -eq $NULL)
{
  . 'C:\Program Files\Microsoft\Exchange Server\V14\bin\RemoteExchange.ps1'
  echo "- Exchange Management Shell Loaded"
  Connect-ExchangeServer -auto
  $EMS_loaded = $true
  echo "- Exchange Management Shell Connected"
}

### Functions

function dump_mailboxes
{
  $output_file = "d:\temp\mailboxes.csv"
  echo "Name`tAlias" >$output_file
  # $mailboxes = Get-Mailbox -RecipientTypeDetails SharedMailbox
  $mailboxes = Get-Mailbox -resultsize Unlimited
  foreach ($mailbox in $mailboxes)
  {
    $Name = $mailbox.Name
    $Alias = $mailbox.Alias
    echo "$Name`t$Alias" >>$output_file
  }
}

function dump_all_mailbox_permission
{
  $output_file = "d:\temp\mailbox_permissions.csv"
  $lijst = import-csv -delimiter "`t" d:\temp\mailboxes.csv
  $aantal = $lijst.count
  $teller = 0
  write-host "Aantal functionele mailboxen: $aantal"
  echo "Mailbox`tAuthType`tGroup`tSam`tType" >$output_file
  foreach ($regel in $lijst)
  {
    $teller++
    $Alias = $regel.alias
    write-host "$teller / $aantal -> $Alias"
    mailbox_permissions $Alias >>$output_file
  }
}

function mailbox_permissions($mailbox)
{
  if ($perms = get-mailboxpermission -identity "$mailbox" | where {($_.isinherited -eq $false) -and ($_.User -like "$global_ad_short\*")})
  {
    foreach ($perm in $perms)
    {
      $usr = $perm.User.tostring()
      $typeusr = (get-qadobject -identity $usr -DontUseDefaultIncludedProperties).type
      $usr = $usr.replace("$global_ad_short","")
      $rights = $perm.AccessRights
      if ($typeusr -eq "group")
      {
        $members = get-qadgroupmember -identity "$usr"
        foreach ($member in $members)
        {
          $mbmrsam = $member.samaccountname
          echo "$mailbox`t$typeusr`t$usr`t$mbmrsam`t$rights"
        }
      }
      else
      {
        echo "$mailbox`t$typeusr`t`t$usr`t$rights"
      }
    }
  }
}

echo "-"
Monday, January 21, 2013
reset domain administrator password on a win2k8r2 DC
Forgot your domain admin password? Whoops.
On a Win2k8r2 domain controller:
- Boot with the installation media (or any other WinPE kind of media)
- Go to the System32 directory
-
ren utilman.exe utilman.exe.bak
-
copy cmd.exe utilman.exe
- Reboot the system
- At the logon screen, press Windows Key + U. A command prompt will start.
-
net user Administrator "!mynewpass123"
- Log in, start a command prompt.
-
del utilman.exe
-
copy utilman.exe.bak utilman.exe
done :-)
Friday, January 18, 2013
dns config on a domain controller (best practice)
Sometimes i tend to forget…
As a best practice on a domain controller, always add 127.0.0.1 (locahost) as a DNS server, just not as the first entry!
Friday, November 30, 2012
Write image to multiple usb sticks simultaneously
Very neat (freeware) piece of software to write an image to multiple usb sticks at the same time.
Tuesday, November 6, 2012
run processes as a domain user from a standalone computer
Note the: /netonly
runas /netonly /user:domainusername “C:\Program Files (x86)\Microsoft\SQL Server\100\Tools\Binn\VSShell\Common7\IDES\sms.exe”
MemberOf, AllMemberOf, NestedMemberOf
PS D:Usersxxx> (get-qaduser "myaccount").memberof.count
46

PS D:Usersxxx> (get-qaduser "myaccount").allmemberof.count
98

PS D:Usersxxx> (get-qaduser "myaccount").nestedmemberof.count
53
According to: http://msdn.microsof … ibrary/ms677943.aspx: “memberOf does not contain the user’s membership in domain local and global groups in other domains.”
Indeed, AllMemberOf shows these groups too (DomainLocal only in my example).
PS D:Usersxxx> $groups = (get-qaduser "myaccount").allmemberof

PS D:Usersxxx> foreach ($group in $groups)
{
  (get-qadgroup $group).GroupScope
}
Global
Global
Global
DomainLocal
Global
Wednesday, September 5, 2012
get size of directories with powershell, the stupid but fast way
All those ways to get the size of directories with powershell are extremely slow. Especially on network shares.
e.g.
$colItems = (Get-ChildItem C:Scripts | Measure-Object -property length -sum)
"{0:N2}" -f ($colItems.sum / 1MB) + " MB"
Currently i’m harvesting through roughly 40TB of data and it’s taking me daaaaaaaaaays!
So i’m in desperate need of something faster.
Then i thought about robocopy. Robocopy gives great statistics. So if i do a “dry-run” (list-only, not really copy), i might get the information i need by parsing the output.
Choice of switches:
- /b = backup mode. Supposed to give me access to every file
- /l = list only/dry-run, not really doing the copy
- /mir = action what you would normally do when you would copy the data. This also dives into all subdirectories.
- /r:0 = no retries
- /w:0 = don’t wait on anything
- /ns /nc /nfl /ndl /njh = no logging of any kind. We only want the summary.
Then we get this piece of code (it could be a lot shorter, but i’m keeping it readable):
function get_size_of_dir_in_bytes_with_robocopy ($directory)
{
  write-host "- $directory" -foreground "GREEN"
  [string]$result = robocopy /b /l /mir "$directory" "c:\whatever" /r:0 /w:0 /ns /nc /nfl /ndl /njh /bytes
  if (!($lastexitcode -eq 16))
  {
    $pos = ($result).indexof("Bytes : ")
    $start = $pos + 8
    $length = $result.length
    $end = $length - $start
    $newstring = ($result).substring($start,$end)
    $newstring = $newstring.trim()
    echo $newstring.split()[0]
  }
  else
  {
    echo "CANNOT ACCESS"
  }
}
Tuesday, July 24, 2012
SMB, latency and Office documents
Because of my work, i come across a very common phenomen: the windows SMB protocol and how it relates to latency on your network. Office documents, even more than other types, seem to be affected.
I found a real nice whitepaper by Microsoft. It also contains a lot of (client side) fixes/suggestions.
Here’s a nice example and probably the main reason for the delay:

Wednesday, June 20, 2012
powershell and robocopy
Hmm seems like $lastexitcode is a builtin variable. Nice!
robocopy "\\serverA\shareA" "\\serverB\shareB" /MIR /R:0 /W:0 /MT:4 /NP /LOG:"d:\logs\shareA_to_shareB.log" | out-null
interpret_robocopy_error $lastexitcode
and the function interpret_robocopy_error could be something quick’n'dirty like this:
function interpret_robocopy_error ([int]$errorlevel)
{
  if ($errorlevel -eq 16) { echo "   - Robocopy - ***SERIOUS FATAL ERROR*** "}
  if ($errorlevel -eq 15) { echo "   - Robocopy - OKCOPY + FAIL + MISMATCHES + XTRA "}
  if ($errorlevel -eq 14) { echo "   - Robocopy - FAIL + MISMATCHES + XTRA "}
  if ($errorlevel -eq 13) { echo "   - Robocopy - OKCOPY + FAIL + MISMATCHES "}
  if ($errorlevel -eq 12) { echo "   - Robocopy - FAIL + MISMATCHES "}
  if ($errorlevel -eq 11) { echo "   - Robocopy - OKCOPY + FAIL + XTRA "}
  if ($errorlevel -eq 10) { echo "   - Robocopy - FAIL + XTRA "}
  if ($errorlevel -eq 9) { echo "   - Robocopy - OKCOPY + FAIL "}
  if ($errorlevel -eq 8) { echo "   - Robocopy - FAIL "}
  if ($errorlevel -eq 7) { echo "   - Robocopy - OKCOPY + MISMATCHES + XTRA "}
  if ($errorlevel -eq 6) { echo "   - Robocopy - MISMATCHES + XTRA "}
  if ($errorlevel -eq 5) { echo "   - Robocopy - OKCOPY + MISMATCHES "}
  if ($errorlevel -eq 4) { echo "   - Robocopy - MISMATCHES "}
  if ($errorlevel -eq 3) { echo "   - Robocopy - OKCOPY + XTRA "}
  if ($errorlevel -eq 2) { echo "   - Robocopy - XTRA "}
  if ($errorlevel -eq 1) { echo "   - Robocopy - OKCOPY "}
  if ($errorlevel -eq 0) { echo "   - Robocopy - No Change "}
}
Tuesday, June 19, 2012
Windows 7 as wifi hotspot
Start your Network and Sharing center from the Control Panel
- Create a virtual wifi adapter. From an elevated dos prompt:
netsh wlan set hostednetwork mode=allow ssid=mobile_hotspot key=password keyUsage=persistent
In the Network and Sharing center, you’ll notice a new wireless connection, the default name will probably be “Wireless Network Connection 2”. Remember this, you’ll need it in step 2
- Choose a network connection you want to share, e.g. your Local Area Network Connection. Choose properties, the Sharing tab and enable the “Allow other network users …”.
Select the “Wireless Network Connection 2” (or something else from step 1) as Home networking connection. - Start the wifi hotspot. From an elevated dos prompt:
netsh wlan start hostednetwork
Remember, the wifi hotspot will not start by default, so create a shortcut somewhere. Make sure you enable the “Run as administrator” in the shortcut property.
Wednesday, August 17, 2011
test for files or directories exceeding Windows MAX_PATH (v2)
Oops, tested the previous script on a samba server. For some reason, testing the script on a Windows 2008 R2 domain resulted in an exception. So here´s the new script.
Check will output warnings in red to your screen, all the rest of the data will go to the logfile.
For best results, export to a .csv and open in excel. Then sort the first column.
Calling the script:
path_depth_analysis "G:mydirectory" >c:output.csv
The script:
function path_depth_analysis( $path )
{
  $items = get-childitem $path
  if (!($items.count) -eq 0)
  {
    foreach ($item in $items)
    {
      [int]$length_path = $path.length
      [int]$length_item = $item.name.length
      [int]$total_length = $length_path + $length_item
      if ($total_length -gt 240)
      {
        $item_name = $item.name
        write-host "! - $total_length - $path -> $item_name" -foreground RED
      }
      [string]$fullname = $item.FullName
      [string]$type = $item.GetType().Name
      if ($type -eq "FileInfo")
      {
        echo "$total_length;file;$fullname"
      }
      else
      {
        echo "$total_length;dir;$fullname"
        path_depth_analysis "$fullname"
      }
    }
  }
}
Friday, August 12, 2011
test for files or directories exceeding Windows MAX_PATH
this script doesn’t seem to work correctly in a Windows-Windows environment, please go to test for files or directories exceeding Windows MAX_PATH (v2)
This week i was reading about a customer that needed an analysis of files or directories that were “too long”. As you may or may not know: if the full path to a file exceeds 260 characters, you may be running into troubles, as Windows does not handle that particularly well.
Microsoft’s article on that: http://msdn.microsof … 365247(v=vs.85).aspx
So i was thinking, how hard can that be? Let’s start powershell and write down a couple of lines …..
$maxpath=260

function testmaxpath($source)
{
  $found_yet=0
  $items = get-childitem $source -recurse
  foreach ($item in $items)
  {
     $the_full_name = $item.fullname
     $the_length = [string]$item.fullname.length
     if ([int]$the_length -ge $maxpath)
     {
       write-host "$the_length $the_full_name" -foregroundcolor red
       $found_yet++
     }
  }
  echo "-----------------------------------"
  echo " found $found_yet files/directories"
  echo "-----------------------------------"
}
then just run it against a disk or share, e.g.
testmaxpath e:\data
or
testmaxpath \\192.168.1.5\share_x
That’ll give you a nice overview.
off topic:
if you really want to bug your system administrator, he’ll like this:
mkdir \\server\share\%username%\aaaaaaaaaaaaabbbbbbbbbbbbbbbbbbccccccccccccccccccddddddddddddddeeeeeeeeeeeeeffffffffffffffffgggggggggggggggghhhhhhhhhhhhhhhhhhiiiiiiiiiiiiiijjjjjjjjjjjjjjkkkkkkkkkkkkkkkklllllllllllllllllmmmmmmmmmmmmmnnnnnnnnnnnnnn
subst h: \\server\share\%username%\aaaaaaaaaaaaabbbbbbbbbbbbbbbbbbccccccccccccccccccddddddddddddddeeeeeeeeeeeeeffffffffffffffffgggggggggggggggghhhhhhhhhhhhhhhhhhiiiiiiiiiiiiiijjjjjjjjjjjjjjkkkkkkkkkkkkkkkklllllllllllllllllmmmmmmmmmmmmmnnnnnnnnnnnnnn
mkdir h:\aaaaaaaaaaaaabbbbbbbbbbbbbbbbbbccccccccccccccccccddddddddddddddeeeeeeeeeeeeeffffffffffffffffgggggggggggggggghhhhhhhhhhhhhhhhhhiiiiiiiiiiiiiijjjjjjjjjjjjjjkkkkkkkkkkkkkkkklllllllllllllllllmmmmmmmmmmmmmnnnnnnnnnnnnnn
subst i: h:\aaaaaaaaaaaaabbbbbbbbbbbbbbbbbbccccccccccccccccccddddddddddddddeeeeeeeeeeeeeffffffffffffffffgggggggggggggggghhhhhhhhhhhhhhhhhhiiiiiiiiiiiiiijjjjjjjjjjjjjjkkkkkkkkkkkkkkkklllllllllllllllllmmmmmmmmmmmmmnnnnnnnnnnnnnn
mkdir i:\aaaaaaaaaaaaabbbbbbbbbbbbbbbbbbccccccccccccccccccddddddddddddddeeeeeeeeeeeeeffffffffffffffffgggggggggggggggghhhhhhhhhhhhhhhhhhiiiiiiiiiiiiiijjjjjjjjjjjjjjkkkkkkkkkkkkkkkklllllllllllllllllmmmmmmmmmmmmmnnnnnnnnnnnnnn
subst j: i:\aaaaaaaaaaaaabbbbbbbbbbbbbbbbbbccccccccccccccccccddddddddddddddeeeeeeeeeeeeeffffffffffffffffgggggggggggggggghhhhhhhhhhhhhhhhhhiiiiiiiiiiiiiijjjjjjjjjjjjjjkkkkkkkkkkkkkkkklllllllllllllllllmmmmmmmmmmmmmnnnnnnnnnnnnnn
… and copy some files and set some weird acl’s on them.
Guess what will happen when he wants to delete those directories?
Oh boy, those were the days :)
Tuesday, August 9, 2011
Windows 2008R2 and SCCM 2007 SP2 - Pt7 - Deploy operating systems (Windows 7 SP1)
Another great feature of SCCM is deploying operating systems.
Although you can deploy a whole range of Windows versions, i’m going to focus on deploying Windows 7 with SP1 included.
In order to support Windows 7 (with SP1), you’ll going to have to download and install an extra update from microsoft here kb2489044.
Also, there is an extra issue to deal with.
With the update above installed, it would be possible to support and deploy Windows 7 to known systems, meaning systems that are allready member of the domain and registered with sccm.
Since we’re talking about deploying Windows 7, it is very well possible that a brand new system has been unboxed and you want to deploy it right away. So we’re dealing with unkown systems here.
To support unkown systems, we need to have at least update R2 installed for SCCM 2007 SP2. But update R3 is out so we’re going to install R3.
Before installing R3, there’s a prerequisite here: kb977384.
Then download and install: Update R3 for SCCM 2007 SP2.
Build a reference system
The most easy way to deploy an image is to build a reference system first. This means a plain Windows 7 installation with only the essential software installed that you want to have on every pc. A virtual workstation, like one in VMWare, will do just fine.
- Download the latest installation media from Microsoft. As of this point: Windows 7 with sp1 included.
- Create a virtual machine with only the basic requirements (1cpu, 512MB ram, 24GB thin provisioned disk will do just fine). As of Windows 7 we don’t need to think about the fact that hardware we are going to deploy this image to is likely to be using a different HAL since Windows 7 will do a HAL autodetect on boot. If you don’t know what that means, don’t bother :)
- Boot the virtual machine and boot from the installation medium
- Keep all the settings default. At the point where Windows setup asks for a username and computername press Control+Shift+F3
- Windows now boots into audit mode. More on that on my website: Windows 7 Audit Mode
- Do not close the small sysprep (”Hulpprogramma voor systeemvoorbereiding”) window!!!
- Now install all the software you want. You can reboot as many times as you like, just don’t close the sysprep window. In my case i’m only installing:
- vmware client installation
- from a dosprompt: “powercfg -setactive 8c5e7fda-e8bf-4a96-9a85-a6e23a8c635c” to set the power profile to high performance. This prevents the client from going into standby every time (very annoying!)
As you’ll see, after every reboot, Windows will automatically reboot into Audit Mode again.
- Copy the content of “C:\Program Files\VMware\VMware Tools\Drivers” to a shared folder on your SCCM server, e.g. “\\sccm01\clientdrivers\x86\vmware client\”. This is to ensure we have the appropriate drivers for this system. We’re going to need this to create bootable media for capturing this system.
- Leave the computer as it is for now
Create capture media
Capturing the installation of the reference system is done through capture media.
This is basically a Windows PE cd/dvd or usb stick that copies the content of the harddisk to a .wim file on an external disk or network share.
When you think about that, it’s easy to understand that the PE environment needs to have access to the local harddisk and network interface.
And that’s why you have to make sure these drivers are available and that’s why we have copied al the drivers to “\\sccm01\clientdrivers\x86\vmware client\” in the last step above.
Now we have to update the capture media with those drivers.
- From the SCCM Console, expand site database, computer management, operating system deployment, drivers and rightclick drivers and click Import
- Choose “import all drivers in the following network path” and browse to “\\sccm01\clientdrivers\x86\vmware client\” and click Next
- In the overview you’ll see that all drivers for the audio, mouse, scsi controller and network controllers are found. Click Next
- Click “New Package”, Name = “VMWare Client” and Drive Package Source = “\\sccm01\clientdrivers\x86\vmware client\”, select “Update distribution points when ready” and click Next
- Do not update any boot images at this point and click Next, Next, Close
- From the SCCM Console, expand site database, computer management, operating system deployment, Boot Images and rightclick “Boot Image (x86)” and click Properties
- On the tab “Windows PE” select “enable command support (testing only)” and then click the yellow icon to import drivers
- Add all drivers, one by one (although only the scsi and network drivers are really relevant) . Eventually click OK and click YES to update the distribution point, Next, Next, Close.
- Repeat the steps for the x64 boot image
- From the SCCM Console, expand site database, computer management, operating system deployment, Task sequences, rightclick Task sequences and click Create Task Sequence Media
- Select “Capture media” and click Next, select “CD/DVD set” and click browse to select an output .iso file (e.g. sccm2007capture.iso) and click Save and click Next
- Click on Browse and select the boot image that matches your installation (x86 or x64) and click OK and Next, Next, Close
Capture the image
- Make sure you have a shared folder on your sccm server e.g. “\\sscm01\images” to store the image on.
- If you are working with a physical system, make sure you have burned the iso that has been created above. If you are working with vmware, put the iso on the datastore.
- Put the capture media in the dvd player. Autorun will start.
- “Welcome to the Image Capture Wizard” click Next
- Destination = “\\sccm01\images\win7sp1referencesystem.wim” and specify the correct network credentials so that after rebooting into PE mode, the capture media knows how to store the image on the SCCM server! Click Next
- Specify the information asked, click Next and Finish
- You may see some screens popping up, just wait and the client will reboot automatically and you´ll see the System Center background and the capture in action
- If all goes well, you’ll eventually get a message “Image successfully captured …”. press OK and the client will reboot. You can then power it off.
If you let it run, it’ll do some sort of “unattended” installation, but it’s pretty useless since the machine isn’t instructed properly what to do (e.g. like joining the domain, install extra components etc).
Import the image in SCCM
- Now that the image has been captured, we have to import it to SCCM
- From the SCCM Console, expand site database, computer management, operating system deployment, Operating System Images and rightclick “Operating System Images” and click “Add Operating System Image”.
- Point to the share where the images is located, e.g. “\\sccm01\images\win7sp1referencesystem.wim” and click Next, Next, Next, Close
- Rightclick the just created Operating System Image and click “Manage Distribution Points” and click Next, select “Copy the package to …” and click Next, select your SCCM server and click Next, Next, Close.
Prepare the PXE server
- Expand (in order) site database, site management, <your site>, site settings, site systems, <your server> and rightclick your server, select New Roles, Next, select “PXE service point” + Next
- Click yes at the warning.
- Select “Enable unkown computer support” and click OK at the warning dialog
- Deselect “require a password …” and click Next, Next, Next, Close
Create the Configmgr package
- Expand site database, computer management, software distribution and packages
- Rightclick Packages, select New, Package from Definition and click Next
- Select the “Configuration Manager Client Upgrade” and click Next
- Select “Always obtain files from a source directory” and click Next
- Select UNC path and your SCCM server should have a default share called \\<SERVERNAME>\sms_<SITECODE>\ with a client folder in it, so in my case “\\Sccm01\sms_vl3\Client”. Point to that directory and click Next and Finish
- Rightclick the just created “Microsoft Configuration Manager Client Upgrade 4.0 ALL” package and select “manage distribution points” and click Next
- Select “Copy the package …” and click Next
- Select only the primary distribution point and click Next, Next, Close
- Rightclick the just created “Microsoft Configuration Manager Client Upgrade 4.0 ALL” package and this time select “Update distribution points” and click Yes
Specify network access
If we’re going to boot from the network later on, and we need to access the distribution points, we need to authenticate.
- On the SCCM console expand site database, site management, <your site>, site settings, client agents and rightclick “Computer Client Agent” and select properties.
- Click on the “Set” button at Network Access Account.
- Specify the Administrator account for now and click OK and OK
- As of a security perspective this might not be best practice but for now it’s OK
Pretty much everything is covered now.
So if we would unbox a new computer, connect all the wires and execute a network boot, this is what we would see:
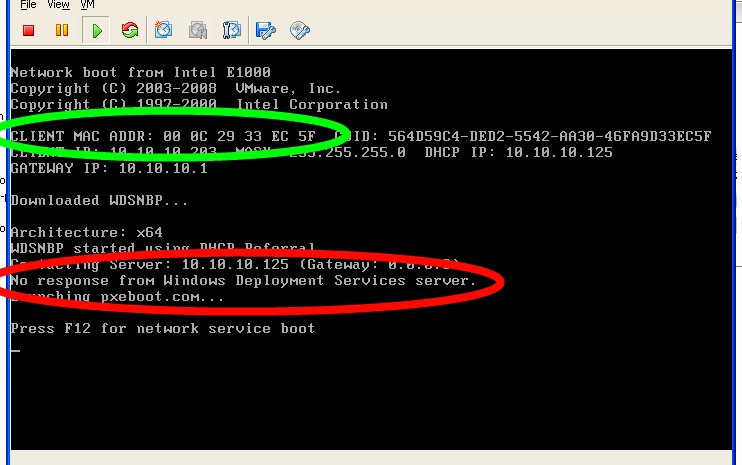
In red: The WDS (or SCCM) server is not responding.
In green: the mac address of this client.
What we need to do next is create a task somehow to deploy Windows 7 to this computer.
Create a collection
- On the SCCM console expand site database, computer management, collections, and richtclick collections en click on “New Collection”.
- Name = “Deploy Win7 with SP1” and click Next
- No membership rules are needed so just click Next and click OK on the warning.
- Click Next Next Close.
Add the computer (mac address) to the collection
- On the SCCM console expand site database, computer management, operating system deployment, computer association, and richtclick computer association and click on “Import Computer Information”.
- Select “Import Single Computer” and click Next.
- Provide the desired computername, e.g.”win7-001”, and provide the mac address of the client. Click Next, Next
- At “Choose Target Collection” select the collection that we’ve created above “Deploy Win7 with SP1”, Next, Next, Close
Create a Task Sequence
- On the SCCM console expand site database, computer management, operating system deployment, Task Sequences, and rightclick Task Sequences and click on “New, Task Sequence”.
- Select “Install an existing image package” and click Next.
- Give the sequence a name like “Install Windows 7 with SP1 on new systems” and select the boot image that corresponds with the architecture, e.g. x86, and click Next
- Select the Image Package (which is your previously captured image) and at Image select “All Images” (this is because a normal Windows 7 installation also contains a 100MB boot partition). Fill in the rest of the information, like the license code and type, and click Next.
- Specify the domain to join with the right credentials and the OU you want to place the computeraccount in and click Next
- Click Browse to select the Configuration Manager package. Click Next.
- Deselect all Stage Migration settings, we’re not going to do that on new systems. Click Next
- “Don’t install any software updates” and click Next, Next, Next, Close.
Modify the task sequence
There is a small “bug” in the default task sequence if you ask me.
If you edit the task sequence, you’ll see that the network configuration is taking place before the device drivers are installed. This should be in reversed order.
- On the SCCM console expand site database, computer management, operating system deployment, Task Sequences, and rightclick the sequence created above and click on Edit.
- Select the green item called “Apply network settings” and drag it just below “Setup Operating System”
With that out of the way there is something with the partitioning to worry about:
- Select the green item called “Partition Disk” and in the “Volume” overview, you’ll see two volumes. One Primary volume with a fixed size of 100MB and one Priamary volume with a fixed size of the original disk of the reference system. Select that volume and click edit. Select “Use a percentage…” and set it to 100%. Click OK and OK.
- Select “Apply Operating System” and make sure that at “Apply operating system from a captured image” image 2-2 is selected
- Select “Apply data image 1” and make sure that at “image” image 1-1 is selected
- Drag task “Apply data image 1” above “Apply Operating System” and beyond “Partition disk”
If you want you can add custom taks or edit. Just look around, very cool! :-)
Hint: look at the partitioning settings and when formatting the disks, make sure you select quick format. Saves a lot of time!
Assign (advertise) the task sequence to new computers
- On the SCCM console expand site database, computer management, operating system deployment, Task Sequences, and rightclick the sequence created above and click on Advertise.
- Click on the browse button to select a collection and select the “Deploy Win7 with SP1” collection that we have created before. Also select “Make this task sequence available to boot media and PXE”. Click Next, Next.
- At the Distribution Point screen, make sure you also select “When no local distribution point is available, use remote distribution point” and click Next, Next, Next, Next, Close.
If you go to the “Deploy Win7 with SP1” collection, doubleclick on the “Win7-001” and go to the advertisements tab, you’ll see that the “Install Windows 7 with SP1 on new systems” is assigned to this computer.
That’s it. Perform a network boot and sit back!